Hello again!
Today I am bringing you a post dedicated to my new obsession... crochet mandalas!
These little rounds of joyful colour are so easy to create and look absolutely lovely. I am planning on making them into bunting to hang in my office. Their brightness will really liven up the room!
I have been posting my creations and recreations on Instagram. I post there more regularly so it may be worth giving me a follow!
I am going to link some great mandala patterns I have recently used, as well as sharing one of my own with you.
First up we have a basic (but beautiful) granny mandala from Crochet with Raymond. You can find the pattern here.

I slightly messed this mandala up on the right hand side when I was fastening off... but it is still beautiful. This particular yarn is from B&M in the UK. It is a lovely colour but actually quite difficult to work with. It is a little bit fluffy and doesn't really allow you to make defined stitches but the colour transition is stunning and I think that makes up for any other faults it may have!
I also tried my hand at creating the Sophie's World mandala from Look At What I Made. You can find part 1 of the pattern here.

This was really a lot of fun and it allowed me to learn how to create front-post and back-post stitches which give the mandala some great dimension. I'm not overly happy with my colour choices but I think the floral centre is really fab! When I have some time over the Christmas holiday I would LOVE to give Sophie's Universe a good go and finish the whole piece! Absolutely amazing work from Dedri.
I found the next mandala on Instagram from Ekte Lykke. You can find the pattern here.

I only chose to use elements of this mandala pattern as I prefer mine to be a little bit smaller but it is gorgeous. This is a beautifully feminine mandala that is delicate and fresh and it is one of my favourites. I can't wait to see this hanging on my wall!
Finally, I am going to share with you one of my own creations. I am going to call this the Peanut Blossom mandala.

You will need:
- 5 different colours of DK yarn
- 4mm hook
- Scissors
- Darning or yarn needle
This pattern uses UK terminology.
Abbreviations:
- St = stitch
- Slp st = slip stitch
- Ch = chain
- Dc = double crochet
- Trb = treble crochet
- Mb = make a bobble
Special stitches:
- Bobble stitch
I apologise for the change in colour on the pictures... taking photographs in natural light can be tricky... especially with pesky clouds!
Ready? Let's get started!
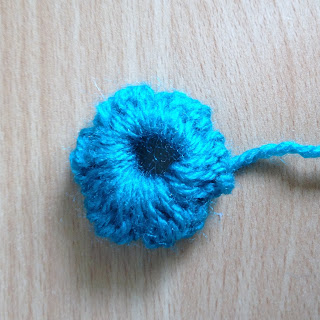
Round 1 - Using Colour A, ch 6 and slip st into first st. *Mb, ch 1* 6 times, slp st into top of the first bobble, fasten off.
You should now have something that looks like this...

Turn it over so it looks like this instead!

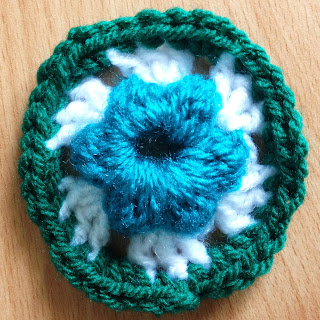
Round 2 - Attach Colour B into any ch 1 space, *3 trb, ch 1* into each ch 1 space, slp st into top of first trb, fasten off.

Round 3 - Attach Colour C into the top of any st. *Dc into the top of every trb, 3dc in the ch 1 space* 6 times. You should end up with 36 sts. Fasten off.

Round 4 - Attach Colour D into the top of any dc. *Trb, ch1, skip 1dc* 18 times. Slp st into the top of the first trb, fasten off. Dont't worry if the sides are curling up... this will be sorted out in the next round.

Round 5 - Attach Colour E into any ch 1 space of Round 4. *5trb, ch 1* 18 times. Slp st into the top of the first trb, fasten off.

Round 6 - Attach Colour B into any ch 1 space of Round 5. *dc, ch5* 18 times. Slp st into the first dc, fasten off.

Sew in all of your loose ends and ta-dah! A Peanut Blossom mandala!
Make sure you show me your recreations of my mandala on Instagram or Twitter... or you can email me at hazelandpeanutblog@gmail.com!
Happy crocheting!
Disclaimer and Copyright: All opinions are my own and all materials have been bought by myself. If you are wishing to sell your creation, get in contact with me so that we can discuss options. Please do not share this pattern on your own publication. If you would like to share this pattern, please link to this blog post. Please make sure you credit me if you are going to share your recreation!


No comments:
Post a Comment